Thursday, 31 January 2019

HOOP OF LIGHT

Hello friends...Hope everyone is crafting great. 

I am happy to share that I have been featured a the Craft Enthusiast of the week on the Prika blog- a wonderful platform that appreciates craft and brings crafters together. Here's the link to the feature Do drop by to know more about me and my crafting journey.


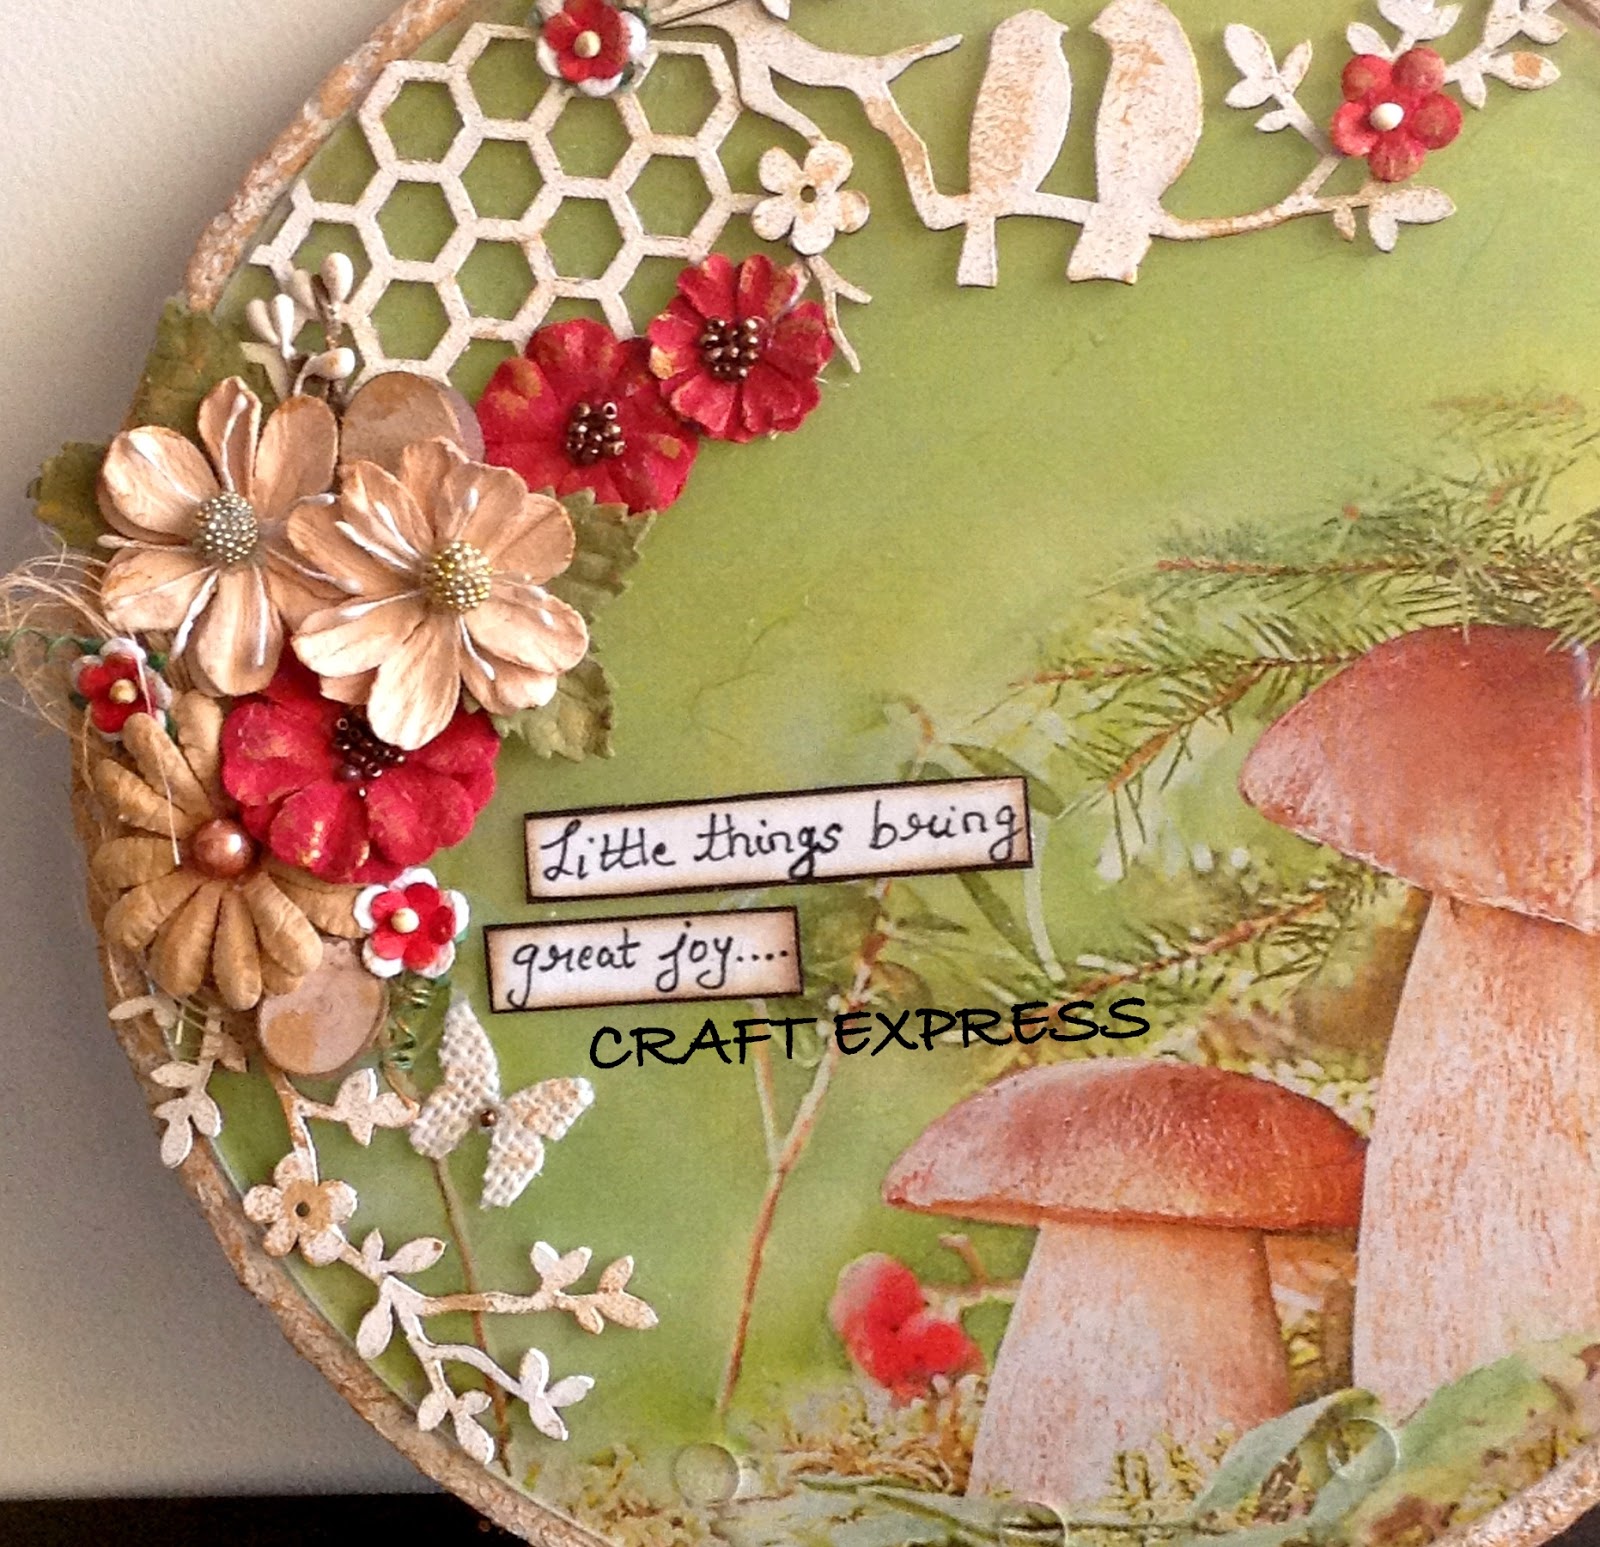
Sharing today a reverse decoupage home decor project .The project is also my Friday Inspiration project for the Prika blog. 


I enjoy altering objects to create utility products and Embroidery Hoop is one such object that has immense possibilities to create. In the past, I have made a fabric clock using the hoop. Have a look ….


This time I have altered the embroidery hoop to make an interesting décor piece, that can be used as a wall light too !!! 


Along  with the embroidery hoop, I have used clear acrylic circular piece, decoupage napkin and some beautiful embellishments to make this beautiful wall piece.


Excited to know how it's made ....Here's the link to the step wise tutorial.

Interesting light effect can be created by attaching strip light to the hoop ring, from the back side. 


Craft is a form of expression…the mushrooms in the project say-Sprout new ideas and Be grounded. Observing them is like drawing attention towards the little things in everyday life….Little things, that can bring great joy !!!


Hope you liked the hoop of light, that is sure to enhance the wall space.

Happy Crafting

Create, Express, Enjoy !!!

Vaishali Khandwala.

Tuesday, 22 January 2019

Desk Decor- Image transfer on different backgrounds


Hello everyone....hope all are doing great....

I am extremely happy to share that I will be continuing as design team member of Itsy Bitsy. This post is my first design team post in the new term. 
Itsy Bitsy has recently launched Instant Image Transfer Gel. As the name suggest, the recently launched transfer gel is Instant...which means now you do not have to wait for hours together to get the image transferred. The magic of transfer happens in just 5-10 mins. Isn't that great !!! 

The instant image transfer gel is great to transfer both  coloured and black and white images. It has good consistency and adhering property. I have created Desk Decor pieces - a clipboard desk calendar and a stationary holder to enhance the desk space....a beautiful working space is always a delight !!!!


In my last post on photo/image transfer, (image transfer and photo transfer means the same) I have shared how to do image transfer on various surfaces like wood, metal, glass, fabric. Here's the link to that. This time lets explore various backgrounds. For this it's important to  understand the basic concept of image transfer  and the difference between image transfer and decoupage.

WHEN IS IMAGE TRANSFER DONE ???
  1. To create personalized products, eg- products with personal pictures, artwork.
  2. To create printed look on surfaces, such that there is no thickness of paper popping out.
  3. To create products, where light needs to pass through image like lamps, votives etc.
DIFFERENCE BETWEEN IMAGE TRANSFER AND DECOUPAGE -
Decoupage is adhering paper on a given  surface, using decoupage glue. Once the paper is adhered, you no longer see the background of the surface, where paper is adhered. On the other hand image transfer is adhering paper, face down on a given surface,  using image transfer medium. Later layers of paper are removed to see the image. Only the print on the paper gets transferred to the surface and as a result you see the background of the surface as well.  To put it up simply, you  get a printed look and there is no thickness of paper popping out.

Hence in image transfer the background is very important. Choosing the right background or creating interesting backgrounds  for image transfer can help you achieve the printed look and this post focuses exactly on that.

Have step wise picture tutorials of the desk decor pieces, made using the transfer technique and as mentioned above have created backgrounds for the transfer in the creations. Sharing the link here

Some interesting picture of the Clipboard Desk Calendar-


And now there is something more to the desk space !!!! Have made a stationary holder, using the wooden bucket bag from the store. This beautiful piece is a great buddy to the desk calendar.


STEP WISE PICTURE TUTORIAL OF THE BUCKET BAG HOLDER USING IMAGE TRANSFER GEL- 

The bucket bag is made of light colour wood and the mild wood grains are seen. So, I left one side of the bag natural...the way it is and transferred an image with quote,' Enjoy the Little Things' on it. It looked printed and elegant as the natural wood is seen. Have a look.

On the other side of the bag, I have created a crackled finish using crackle paste from the store and then transferred the image on it . Its very unique to see the cracks through the transferred image. A quick procedure for this background. The white crackle paste can be applied with spatula directly or through stencils as well. Thicker layer gives bigger cracks and thinner gives smaller. The cracks are formed as the paste dries naturally. Do not speed dry with any tool.


Once the crackled background is formed, the next step is to transfer the image on it. Use an image with lighter colours.


Press well while adhering the image.


Be a little more patient while peeling the layers of paper and you will have a beautiful outcome.


Just love the way the cracks are seen through the transferred image. A closer view-

Last step was to embellish the bucket bag with chippies, twine, flowers and coconut coir as fun element. Add further depth with a little dot stamping. The bucket bag with dual look can be handy to hold some pens, pencils, brushes and is sure to enhance the desk with the clipboard desk calendar.


And this is how the two decor pieces sit together, bringing smile on my face.


Hope you liked the image transfer creations, focused on the backgrounds. There will be many more ideas for creating backgrounds for image transfer and am sure you will explore and share them.

Happy 2019 and Happy Crafting till we meet again.

Create, Express, Enjoy !!!

Vaishali K.


Wednesday, 24 October 2018

Tealight Holders using Natural materials - Happy Festivities !!!


Hello everyone, hope all are enjoying the festive season.  It's the time of the year that's  filled with  joy and warmth. The homes are adorned with beautiful rangolis, diyas, garlands, lanterns and festive decor pieces. I completely enjoy decorating the home and the happiness doubles when its done with handmade decor...I  am sure many of you feel the same !!!
Today's post is my Design Team post for Itsy Bitsy. I am sharing some interesting  DIY  ideas  to make tealight holders, using natural materials.  Children can also be involved to make them.  After all festivals are all about family and friends......So lets's get started and spread brightness around !!!!


I have a step wise picture tutorial of not one, not two, but six different ideas here.... All using natural materials. Its a picture heavy post, so sit back, relax and enjoy the festivities !!! Do not forget to make one for yourself and add a handmade touch to your decor....

1. Tealight holder with wooden bark - 


2. Tealight holder with skeleton leaves-


3. Tealight holder with jute chord- 


4. Tealight holder with wooden discs- 


5. Tealight holder with burlap- 


6. Tealight holder with wicker ball- 


Hope you liked the tealight holder ideas using the natural materials. They have their own uniqueness and elegance, amidst the otherwise bright festive decor.


Wishing everyone happiness, peace and prosperity ......Have a great time  !!!!

Create, Express, Enjoy !!!!

Vaishali Khandwala

Tuesday, 2 October 2018

SUCCULENT PLATTER - MY HAPPY PLACE - DECOR PIECE WITH EMBOSSING TEXTURE PASTE


Hello friends. 

Hope everyone is crafting great !!! Today's project is an extension to my last creation - Decoupaged Candle with Embossing Texture Paste effects. The beautiful candle needed an equally beautiful space for display....and that brought in the idea of creating a platter for it, which would also work as a center piece for the table !!!

Handmade Succulents from  Itsy Bitsy have always been on my wish list...So the next thought as I developed the idea was to use the beautiful succulents to decorate the platter and make a 'Succulent Platter' with space for candle. The platter definitely creates  a happy, warm corner at home and makes a perfect decor piece for the upcoming festive season !!!!


This creation is also my inspiration post for the Itys Bitsy's current month blog challenge where 'Anything goes with Embossing Texture Paste ', so do play along and have fun.  Looking forward to your beautiful creations.


Have used embossing texture paste in different ways in this platter. The embossing texture paste creates lovely textures, which compliment the succulents and of course the decoupaged candle.


I have recycled a fiber frame, (that came as part of fancy packaging for dryfruits) to make the platter. The size of platter is 11 x 8.5 inch. You can recycle any old tray/ frame or even work on reverse of a frame canvas to make the platter. The frame that I recycled had some self textures on it. In case you are working on a plain surface then you can create textures using fiber paste or grainy texture paste from the store. I have a  video tutorial explaining the process of making the platter, along with helpful information regarding embossing texture paste, which is available in 12 beautiful colours.


Had  also shared a  video tutorial of Decoupage on Candle, in my last post. In case you missed it here's the link. Hope you enjoy the video tutorials and find them useful to create something unique for celebrating the festivities.

Do check some still close ups below,  before you hop on to the tutorials -


Frothy effect created by the embossing texture paste.


The gorgeous succulents- these handmade, paper succulents are available both as ornamental flower bunches and 3 dimensional forms in paper vases and cork pots. This product from Itsy Bitsy's own brand Little Birdie is sure to add great dimension to your projects, especially the 3D miniatures.


Have used natural materials like sisal fiber, burlap sheet,  brown paper cylinder (card board tubes),  mini unfinished wooden discs (wooden log slices ), wooden green beads, green hemp, mix media stones. They all blend well with each other and compliment the succulents along with the effects created by embossing texture paste.


Top view of stepping stones in my little succulent garden.

I call this creation - 'My Happy Place' as making this brought me a lot of happiness and a I feel like staying in this garden space all day long. The glow of the candle adds warmth and magic ....giving me a fairy land kind of feel and cannot stop imagining myself jumping on the stepping stones and playing amidst beautiful flowers, birds and butterflies !!!!


Wooden log and Succulent embellishments.

My Happy Place

The  platter makes a lovely decor piece for dining table or center table. With space for candle.... its sure to spread warmth and welcome the guest in style.


Hope you liked the creation. Do not forget to like, comment and subscribe to my you tube channel for regular updates. Sharing link to my you tube channel.

Looking forward to hear from you. 


Create, Express, Enjoy !!!!
Happy Crafting...

Vaishali Khandwala


Monday, 17 September 2018

Candle Decoupage with Embossing Texture Paste Effects

Hello friends. Hope all of you are doing great. 

Today's post is very special to me as I am sharing my first craft video tutorial with everyone.  I am grateful to each one of you for showering so much love and support to my blog posts and appreciating the the content shared in the step wise picture tutorials. Hoping that you will enjoy my video tutorial and find it useful as well.
With the upcoming festive season, candles make a great gifting option. Today's post is about decoupage on candles and adding interesting effect to it with embossing texture paste. It is also my Design Team post for Itsy Bitsy- inspiration for the current month blog challenge where anything goes with embossing texture paste.


I have used embossing texture paste from Itsy Bitsy's own brand 'Little Birdie', to add interest to the otherwise simple decoupaged candle. 

Some important features of embossing texture paste-  
  1. Embossing texture paste comes in 12 different colours, in wide mouth jars for ease of use.
  2. It is a thick paste that can be applied through stencils or directly.
  3. You can use it with palette knife or  brush.
  4. It is a heat embossing texture paste which means that  the paste bubbles up to give a frothy/ puffed effect , when exposed to heat, using  a heat gun. Hair dryer does not do the job.
  5. The embossing texture paste can be used on all surfaces like wood, metal, glass, ceramic, paper, fabric, terracotta etc.
  6. The paste is not washable, however  it is water resistant when dry. It adheres to the surface permanently, once heat set. Does not come off.
  7. The amount of bubbling / puffing of paste is proportionate to the thickness of paste applied and to the amount of heat/ time of heat, it is exposed to. More the thickness of paste applied, bigger will be the texture created and apply less thickness of paste for finer texture. Similarly, more the heat time, more will be the bubbling up and vice versa.
  8. Once the embossing paste is heat set to create the texture, it dries instantly and  can be further coloured with acrylic paints or colour sprays.
  9. When the embossing texture paste is heat set, the colour of paste lightens to a large extent.
  10. The embossing paste is used to add textures and give further depth and dimension to the project. It is a great way to create a moss effect or a frosty, snow effect with ease.
A bit about Decoupage on Candle- 
There are different ways of working on candles. Here I have decoupaged on candle, using decoupage napkins. I have used a white, cylindrical,  pillar candle that was lying with me. You can use candle of any shape and size. Itsy Bitsy has a wide range of candle making supplies for those who like to make their own candles. Have used  decoupage napkin named, 'Herbal Shelf' , from the store. Many beautiful designs are available in the decoupage craft category of the store. Basically the idea is to set the napkin into the candle, using a heat tool. With the heat tool, the wax melts, allowing  the napkin to adhere to the candle. Decoupage glue is not used for this work.
If you do not have a heat tool, you can use a hair dryer or iron for the process. However heat tool makes the process much easier and gives better results.

Tips for using Embossing Texture Paste on Candles-
I have used, embossing texture paste (colour - Berry Bliss) on candle, as this colour goes well with the colours in the decoupage napkin used. The embossing texture paste needs to be used with a little care on the candle, as when the paste is exposed to heat, the candle wax also melts . So do not use the heat tool continuously, stop or take it away in between. Else the wax may melt too much, distorting the shape of candle. Also when using the  embossing paste on top edge of candle, the wax melts and drips down on the already decoupaged napkin. Wipe that off immediately.

Close up of embossing texture paste effect- it's great for Christmas Candles.

Wonderful glow when lighted.

The beautiful succulents, napkin design- 'Herbal Shelf', with so much depth.


Here is the link to the video tutorial,  explaining  the entire process of decoupage on candle along with some added tips and information on how to use decoupage candles.


https://youtu.be/zsAPJVd5yC0


Hope you enjoy the video and find it informative. Looking forward to your feedback, with lots of excitement. 

Some pictures-


Wishing that the glow of candle brightens your space and adds lots of warmth and happiness to your lives.


Happy Crafting till we meet again.

Create, Express, Enjoy !!!

Vaishali Khandwala.

Tuesday, 28 August 2018

Decoupage Tote Bag- Fabric Decoupage with a Twist

Hello my arty, crafty friends, Hope you all are doing great. 
I am super excited about sharing this fabric decoupage project with everyone.  Its my DT creation for Itsy Bitsy. Many of you must have explored decoupage on fabric. When working on a fabric surface, one medium that I find  interesting is ‘ Fabric Stiffener’. This wonderful product  has various uses and I have used it in some unique ways in my creation.
I have a step wise picture tutorial of this Decoupaged Tote Bag, so sit back , relax and enjoy this new technique here
Some close ups
The dimensional effect

The grooved effect

Do check the tutorial to know how to create these amazing effects with decoupage napkins and fabric stiffener.

Fabric Stiffener is an amazing product, when working with fabrics. Have used it earlier as well to create a fabric clock. 
For the clock, I have used the fabric stiffener to stiffen the cloth. This helped the cloth to remain firm and the clock machine could be fixed to the cloth with ease. I am so thankful to Itsy Bitsy’s own brand Little Birdie for making this wonderful product.
Say ‘No’ to plastic bags, design your own cloth bags and use them to save the environment ……flaunt them around as well when you have a beautiful handmade one !!!!

Happy Crafting till we meet again.
Create, Express, Enjoy !!!
Vaishali K.