Tuesday, 30 January 2018

MIX MEDIA DIARY

Hello friends 
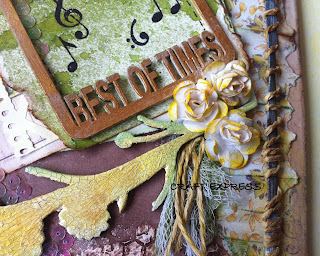
I am sure that with that with the start of the new year, you would have bought new diaries and planners ....they come across as gifts as well. Sharing today a picture tutorial to add a handmade touch to the plain diary cover and making it interesting to use....
I have used mix media technique for this alteration.

Step- 1 Start working on the front cover of the diary 


Step-2  Here you can add any die cuts, handmade paper, laces, trims available with you. 


Step -3  Add textures with modelling paste. I have used Mont Marte modelling paste. This is to create effects in the background.


Step -4 Now its time to glue variety of embellishments. Use up things from your stash rather than purchasing stuff from the market. At this stage, composition is very important. Arrange the embellishments to create a good form and define a focal point.

Step -5 Next is to cover everything with black gesso using brush or sponge. I have used black gesso from Mont Marte. Once the black gesso dries completely, do a  dry brushing with white gesso.

Step -6 Its time to add colours. I have used water based  sprays. You can used acrylics also. If using acrylics with brush, use feather light storkes, do not over brush. 


Step -7 Colour to get the desired effect, give depth to the focal point and highlight with metallic paints 


Few more pictures of the final diary cover 
Isn't it  fun to play with colours and textures and give a wonderful look to the otherwise boring plain diary covers ??? And the great part is you can use materials that you already have at home.....

Sharing pics of one more such alteration 


Do give mix media a try and give objects around you a handmade touch. Its  a very forgiving art form and makes you feel like an artist.
Happy Crafting 
Create, Express, Enjoy !!!!

Monday, 22 January 2018

TRAVEL IN STYLE

Hello friends, Hope everyone is doing great....
Sharing today a quick and fun project....HANDMADE PASSPORT COVERS 
Passport covers are a great utility product to protect our important travel document.
A handmade touch to them, definitely is a chance to flaunts ones style!!!

So here's is picture tutorial of passport cover with a touch of mix media. 
I started working on a plain fabric passport cover. The cover was off white creamish in colour. 
Step-1 Cover the passport cover with white gesso using a brush or a sponge. I have used the Camel artist gesso. This creates a base to work further. Place a plastic sheet inside the cover before working. This protects the inside while working. You can also insert  a sheet of cardboard cut to size on the inside, to get support while working. 

Step-2 Once the gesso is dry, I have stamped with a clear acrylic stamp, using brown archival ink from Ranger. The  stamp is from the travel stamp set from Itsy bitsy. It is a great stamp set to have as it has various travel theme stamps like postage, airplane, ship, travel sentiments and lovely background elements.  Comes handy while creating passport covers.


Step-3 Next  I have added a little texture, by stencilling with modelling paste and script stencil.


Step-4 Once the modelling paste dries, its time to play with colours. I have used water based spray colours in the shades of green and yellow.

Step- 5. You can see in the picture above that, I have added some burlap embellishments.
I have created them using the travel stamp set. I took a burlap sheet and stiffened it using a fabric stiffener. Once the sheet was stiff and easy to cut, I stamped some travel images using black archival ink. This was followed by fussy cutting the stamped images and they were ready to use.

Step-6 Adhere the fussy cut images with mod podge and embellish further using burlap lace, twine and buttons. 


Step- 7  Varnish the passport cover using spray varnish, the next day and your passport cover is ready to use. I made a co- ordinating travel tag along with the passport cover.


Passport covers are fun to make. Do give them a try and travel with style !!!
They can be personalized as well and make wonderful gifts for all ages .


Happy Crafting.....
Create, Express, Enjoy !!!

Wednesday, 10 January 2018

DECOUPAGED WALL CLOCKS

Hello everyone. 
It seems yesterday that we send new year wishes to each other and its already the 10th day of 2018. Time flies indeed !!!!
And to tell the time, we have wall clocks. 
Handmade clocks are always unique and enhance the decor in style. 
Today I would be sharing step wise procedure to create  a decoupaged wall clock . 

Decoupage is a wonderful technique to create home decor products. 
Some time back, I made a wall clock for a client. 
Considering the humid weather of Mumbai, the base material used was clear acrylic. 
You can use  a mdf base as well.
Since the wall clock was for the kitchen space, I decided to give it the shape of chopping board. The shape was laser cut from the clear acrylic sheet. The arrangement to fix the clock machine and hang the clock were made as well.

Step-1 
The first step was to cover the base with gesso. Gesso acts as a primer, giving tooth to the paint and is also must when you plan to decoupage on non porous surfaces like glass or acrylic.
I have used chalk paint from home decor (colour-  sheep skin. its a lovely off white colour ) instead of gesso.
Chalk paints are acrylic paints with chalky matt finish and properties of gesso. 
So if u choose to work with chalk paint, gesso can be avoided. 
Next I decided on the print of tissue that I wished to adhere. 


Step -2
I wanted distressed look to go with the tissue print. Decoupage is not just about adhering a paper to the surface. The work gets depth and dimension only when the paper merges with the background. 
Here I used distressing technique for the background. Apply black acrylic paint, where the distressed look is desired. Refer to the pictures for details.
Step -3
The next step is to adhere the selected tissue. Always tear the tissue with hand, do not use scissors. This gives a natural look and it merges well with the surface. Mildly sand the surface with fine sand paper to get a smooth surface, before laying the tissue.
I have adhered the tissue, using decoupage glue from Plaid called Mod Podge (matt finish).
When laying  a tissue, always work in parts, to get a wrinkle free output. 
Give a drying time of about 1 hour and then apply the top coat of mod podge over the tissue. The top coat seals the paper ( tissue here ) and prevents it from yellowing.
Note mod podge is to applied only on the tissue and not the surrounding painted area.

Step-4
Now its time to further work on the background to give depth and dimension. I have done some colour blending with a shade of yellow acrylic paint. The leaf image is a stamping done with green archival ink. Have also stamped the quote- the sweet life with black archival ink. Some texture is added through stencil, on the handle part using texture paste.

Embellishments make a world of difference. Here I have embellished with paper flowers, twine, metal charm and a cute cork bird. Kept it minimal though to make it maintenance friendly.
Step- 5
Leave the product for 24 hrs. Now the next day varnish the entire clock, both the paper and the painted area with water based varnish. Apply at least two coats with drying time in between. I have used Aquadur wood varnish from Asian paints. Its time to make it functional now. I adhered the foam numbers and fixed the clock machine and hands. Here is the final look of a cheerful, wall clock for kitchen.

Wall clocks are fun to make. Sharing pictures of some more decoupaged wall clocks made by me.

                                                 Wall clock for a girls room

Ethnic wall clock for living space

Happy day wall clock on fabric base 

I hope you have enjoyed the post and would try creating one for yourself.
The ticking of the clock reminds us to cherish the past, live in the present  and look forward to the future with fulfillment. 
May each passing moment brings new dreams, hope and happiness to all of us.
Happy Crafting from Craft Express
Create, Express, Enjoy !!!